6 Symptoms of a Bad Radiator Cap (and When to Replace)
Combustion engines generate a lot of heat just from normal operation. Without removing heat from the engine, the vehicle will encounter a slew of problems that eventually lead to engine failure. A failure of the cooling system could leave you stranded, and may even cause total engine failure in extreme cases.
Fortunately, a common and easy to fix cause of cooling system issues is a bad radiator cap. Knowing when to replace a radiator cap is pretty simple when you know the signs.
How Does a Radiator Cap Work?
The radiator cap is the gatekeeper of the cooling system. The cooling system uses pressurized coolant (also known as antifreeze) to take accumulated heat away from the engine. Having a functional radiator cap is critical to this process, as it maintains the proper amount of pressure.
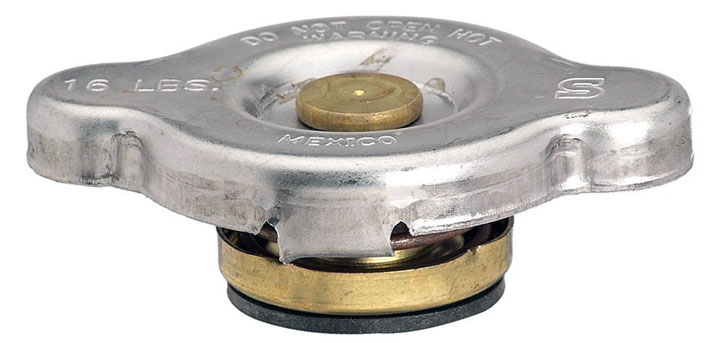
Each radiator cap is rated for a certain amount of pressure it can hold (e.g. 0.9 bar, 13 PSI, etc). Different cooling systems call for different pressures. It is important to buy a radiator cap that matches the factory specification.
Pressurizing the cooling system is necessary to increase the boiling point of the coolant. This enables the liquid to hold more heat before evaporating.
Most engines have a normal operating temperature right around the boiling point of water (212° F). If the coolant in the engine were to boil, it would not effectively cool the engine since a gas will not remove heat from the system nearly as well as a liquid will.
A cooling system at optimal pressure enables the engine to run more efficiently and protects it from damage.
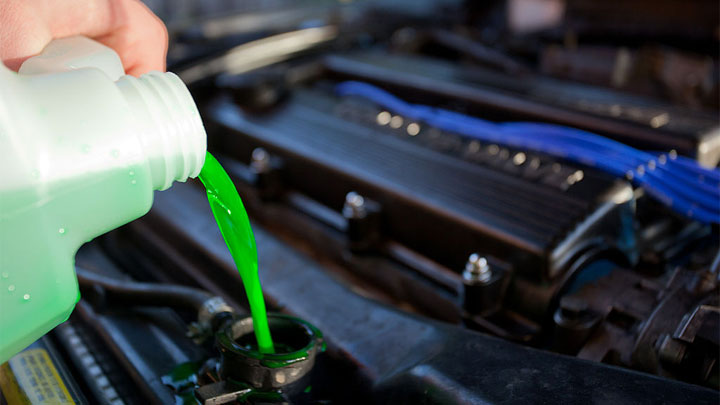
Coolant is usually made up of water and antifreeze in a one-to-one ratio. The water absorbs the heat from the engine and the antifreeze further raises the boiling point of the coolant.
Evaporation of coolant is undesirable because gaseous coolant will either leave the system entirely through a leak or will take up more space than it should which causes overpressurization.
To avoid overpressurizing, which can damage components of the system, a spring-loaded valve on the radiator cap vents excess coolant into the expansion tank (also known as reservoir). Under lower pressure, the cap draws the coolant back into the cooling system.
Please note: since the cooling system is hot and under pressure when the vehicle has been running, it is very important that you never open the radiator cap until the vehicle has cooled completely.
If you attempt to remove the radiator cap while the engine is warm, the coolant (likely as hot as boiling water) would shoot out and could seriously injure you; third degree burns are a very real possibility.
If you’re unsure, carefully feel the hoses. If they are hot, wait longer (or overnight to be safe) before opening to avoid a scalding geyser of coolant in the face.
Bad Radiator Cap Symptoms
Many symptoms of a faulty radiator cap can also be signs of another problem, such as the much dreaded head gasket failure.
If you suspect you have an issue with your head gasket(s), it’s not a bad idea to replace the radiator cap first since it’s so quick, cheap, and easy, before throwing more time and money at a potentially expensive problem.
See Also: 5 Symptoms of a Faulty Radiator Fan
#1 – Coolant Leak
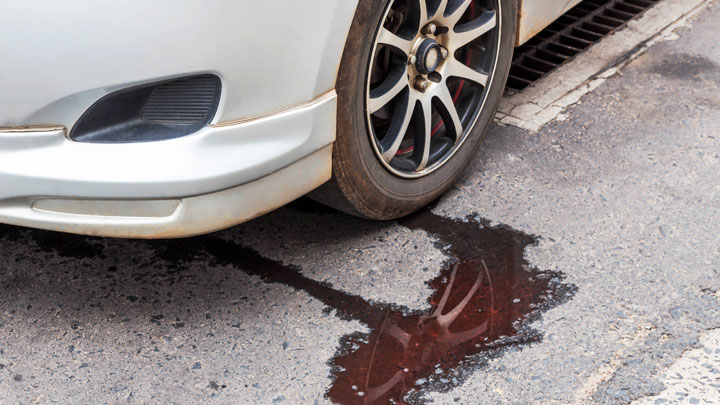
If you attempt to use a radiator cap that holds more pressure than the system was designed for, you may introduce a leak, especially if it causes an old coolant hose to fail. This could also happen if the radiator cap fails to allow excess pressure to bleed into the coolant reservoir when the system reaches the target pressure.
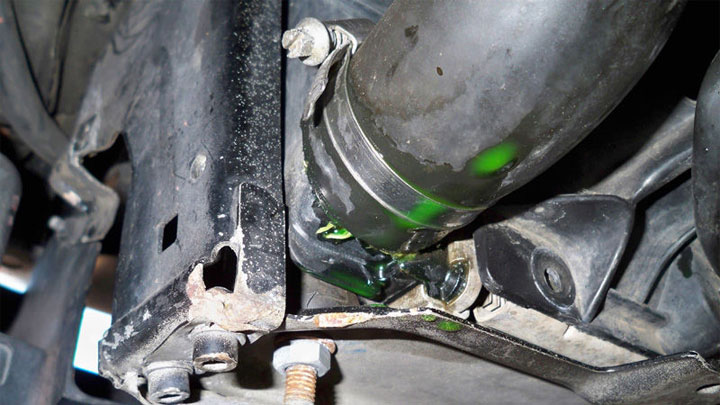
Since substances naturally take the path of least resistance, the weakest point will leak coolant if the system is overpressurized. The leak may be at the cap itself, gaskets, hoses, water pump, or the actual radiator.
You can determine where the leak is by warming up the vehicle to pressurize the system and then carefully looking for leaks under the hood. Since different vehicles use different types of coolant, it can be either bright green, orange, red, yellow, or blue.
Sometimes these leaks will only manifest at operating temperature or after driving for a while. Since the system is under pressure, you may notice a leak spraying from a coolant hose into the engine bay, or even straight up into the air!
To locate the source of a leak, wait until the engine has cooled then pinch hoses in the vicinity of the suspected leak. If you notice coolant bleed out when you pinch a hose, that’s the one you need to replace.
Coolant hoses are cheap and easy to replace yourself. Just be sure to bleed or burp the cooling system when you’re finished; air in the system could cause your vehicle to overheat.
#2 – Overheating Engine
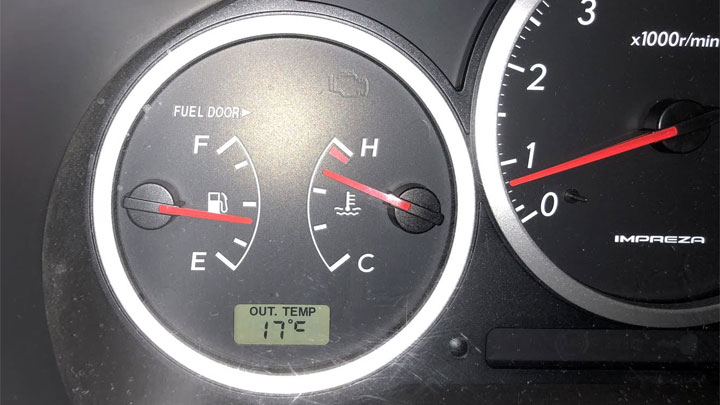
If you’re wondering whether a bad radiator cap can cause overheating, the answer is a definite yes.
Air pockets in the cooling system from an ineffective seal (such as one in a bad radiator cap) or a lack of sufficient pressure can cause the engine to overheat. The latter lowers the boiling point of coolant which makes it unable to absorb enough heat from the engine.
If you see the temperature gauge on the dashboard rise, it’s wise to stop driving as soon as it’s safe to do so and wait for the engine to cool down before continuing (or call a tow truck).
Allowing the engine to overheat will eventually cause engine failure as the parts begin to take damage or warp due to excess heat.
#3 – Steam from Engine
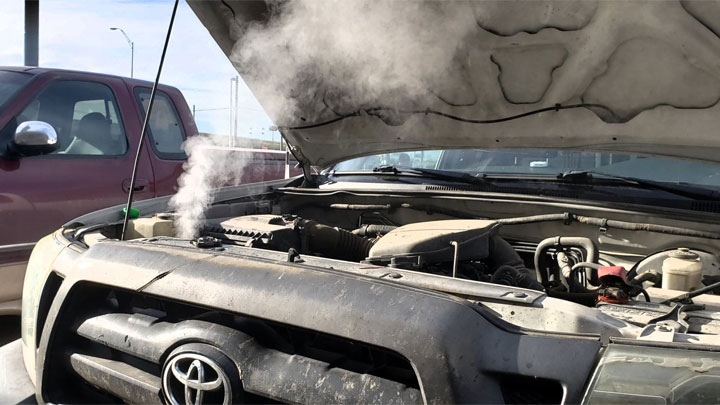
As coolant boils, it evaporates, turning into a gas which looks like steam. If your engine begins billowing steam, the coolant is boiling and escaping through a bad seal which may be in your radiator cap.
The engine will also eventually overheat so don’t wait to get your vehicle taken care of.
#4 – Collapsed or Torn Radiator Hose
Internal pressure fluctuations can cause warping and/or tearing of the hoses. When the pressure gets too low, it causes a vacuum effect which collapses one or more hoses. Overpressurization can also cause cracks in the line.
When inspecting the cooling system, check that no hoses are hard or feel spongy. Spongy hoses are weak and may collapse, while hard hoses are brittle and can’t take much more abuse before they crack under pressure.
#5 – Low Coolant
If the coolant overheats and evaporates as visible steam, it’s leaving the system and won’t come back. Leaking works the same way, of course. If you see that your coolant level is dropping, you know you may have a problem.
Make sure never to let your coolant run below the recommended level. This is usually indicated by a low mark on the coolant reservoir. In a pinch, you can use distilled water to top off the coolant level until you are able to refill it with actual coolant. Note: using water that contains minerals may corrode the cooling system.
#6 – Overflowing Reservoir
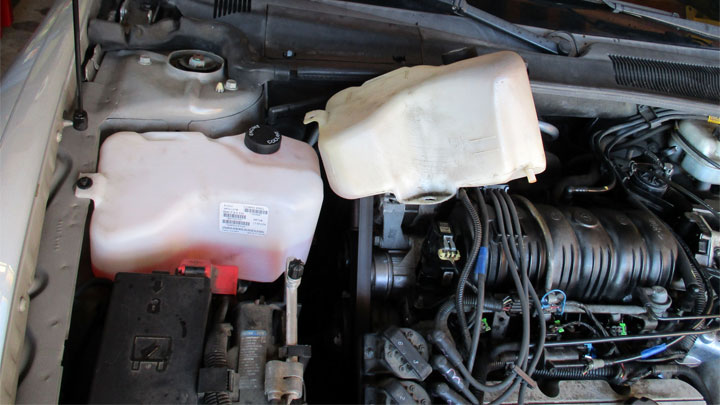
When there is a problem with the radiator cap, the coolant may go to the reservoir without the normal trigger of excess pressure. This can cause the coolant overflow tank to, well, overflow or release prematurely.
Related: What Happens When You Overfill Coolant
How to Tell If Your Radiator Cap Needs Replacing
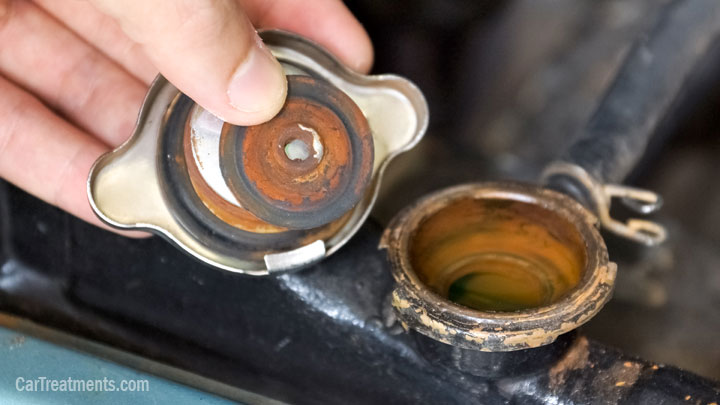
If you suspect your radiator cap is leaking, you can first remove it and inspect it. Of course, never do this when the vehicle is still hot to avoid getting a bad burn! In the same way, avoid opening the hood of the engine if steam is coming out as that can also cause a scalding injury.
The radiator cap may have build-up of debris causing the malfunction. You can try cleaning it with water and a toothpick, though it’s usually better to just replace it since it’s relatively cheap and engine failure is an expensive potential alternative.
You can also get a radiator pressure tester to check for pressure leaks in the system. Always replace the radiator cap with one of the same pressure rating.
If you replace the cap with one that takes a higher pressure before the valve opens, the vehicle can over-pressurize which causes other issues such as overheating or hose rupture.
It’s also a good idea to check the other parts such as the reservoir and hoses for cracks and other issues while you’re in there.
Since the symptoms of a bad radiator cap mirror those of other cooling system problems, there could possibly be two weak points at the same time. Then once you replace the radiator cap, the other weak point is likely to break.
See Also: Tips to Flush a Radiator (and Cost)
Radiator Cap Replacement Cost
Best places to order parts? See: 19 Best Online Auto Parts Stores
Radiator caps are relatively inexpensive to replace. You can easily do it yourself so there are no labor costs.
The caps themselves usually cost less than $25 at an auto parts store, though you can expect to pay more if you want a model with a built-in thermometer to indicate the coolant temperature.

He’s known for his attention to detail and problem-solving skills and enjoys coming up with out-of-the box solutions when the situation requires it.
When he's not troubleshooting customers' cars, you'll most likely find him working on his current project ('96 Bronco) or cooking Italian food for his family.
- Replace the Engine or Replace the Car? (11 Factors to Consider) - Apr 11, 2024
- Plastic Piece Dragging Under Your Car? (What It Is and What To Do) - Mar 21, 2024
- Timing Belt vs Timing Chain (What’s the Difference?) - Feb 27, 2024
I have changed my water pump my thermostat my coolant temp sensor my upper and lower hoses my or hoses my rad my coolant my full thermostathousing ..antifreeze..
And I am having to top up my overflow bottle as it goes down a little at night..
Why is this,?
Does it go down after a drive or when it sits overnight?
If it goes down after a drive, you may be leaking coolant into the combustion chamber. If it does down overnight, you’re probably leaking it onto the ground somewhere. You should be able to narrow down the leak using your nose (the coolant smell will be stronger near the leak), or look for white streaks around the cooling components. You may also notice a little puddle under the vehicle or a stain where it dried up.
They also make UV dye you can put into the coolant to help you track down leaks with a black light.
If my coolent cap is tight my f550 6.4l diesel will try to over heat ive flushed system replaced thermostats but when my cap is loose it doesnt over heat
The radiator cap is what holds the pressure and increases the boiling point of the system. This is important for proper function of the cooling system. It’s also dangerous to leave the cap loose because there is risk of the hot coolant burning you, so I highly recommend taking the vehicle to a shop to get checked out and repaired. If you’d like to try a few more things yourself, check out this article: http://cartreatments.com/causes-and-symptoms-of-engine-overheat/.
Same problem on my Dodge van, Can anyone answer the question without giving me safety tips about it? Its overheating when the cap is on.. So doing possible engine damage.. Can someone tell me why its doing this?
I have a 1990 ford explorer. It keeps run hot. I can drive it for 20 minutes before it starts getting hot. Open the hood and steam is coming from the radiator and resaivor. Can anyone help me? Ty
Make sure your cooling fans are plugged in and operational. Check the fan fuse – a blown fuse would prevent them from turning on, which could quickly overheat the vehicle if you’re not moving quickly.
Next, check your thermostat. If your thermostat is stuck closed, your vehicle will overheat very quickly because it is not able to get hot coolant out of the engine and pull the cooler stuff from the radiator.
You can easily test your thermostat by pulling it out and throwing it in a pan of boiling water. If it opens, it’s probably good.
Hey there, don’t panic. There are a lot of things that could go wrong with the cooling system and they can be difficult to pin point. However, follow these steps to find the actual cause of your cooling system malfunction;
1. Make sure you use an original new Jeep radiator cap. They are cheap and could simply be the root of your problem. Using general or aftermarket caps could result in a lot of problems, one being the coolant easily boiling and creating vapors that seriously reduce the effectiveness of your cooling system. Your car is 30 years old, it’s likely due for a new original cap.
2. Make sure you have no leaks. Check the hoses on top and the bottom, coolant turns white when it dries up, so it’s easier to identify. One or two hose(s) sit on top and run straight from the engine to the top of the radiator. Another hose or two hoses are at the bottom of the front engine bay run from the middle or bottom to the radiator. Rub your fingers along them and check if they’re dry. Check if you can see any cracks or perhaps small leaks. If so, you might simply lose coolant or introduce unwanted air in the cooling system. If so, replace the hoses or have someone replace them for you.
3. Let the car idle and set the AC to the coldest setting. If you don’t have AC, just wait for the car to warm up while idling and check if the radiator fans in the engine bay turn on. If not, they are likely the issue. The fans normally only work when the car needs extra cooling while driving and/or it’s not driving. While driving, the wind normally cools the radiator enough.
4. After testing the AC and fans, set the heater to maximum and check if you get steady hot air from your vents. If the air stays cold or if alternates between hot/warm and cold, your waterpump is likely malfunctioning and needs replacing. Repairing a waterpump is not really worth the effort, just have it replaced if needed.
5. Park the car at a slight incline with the parking brake on tight and let it cool down for 6 to 12 hours. When the car is cold, open the radiator cap and insert a funnel into the neck of the radiator. Wrap the neck of the funnel with tape until it is wide enough to sit tightly in the neck of the radiator. Also place an empty bucket near the radiator on the ground. Prepare a long screwdriver with a ball of tape on the end and test if it can plug the neck of the funnel. Fill a third of the funnel with fresh coolant and let it idle for a good 15-20 minutes to allow possible gasses and air bubbles to escape while coolant enters the system. After 15-20 minutes, no more bubbles should appear and you should plug the funnel with a long screwdriver with a ball of tape on the end. Safely remove the funnel with the hot coolant and drop it the bucket. Then close the radiator with the cap. Again, take precautions, coolant can be extremely hot and is a toxic mess!
6. Make sure your coolant is a bright color and very, very clean. No particles or oil should float in or on the coolant. If so, use a chemical coolant flush, rinse with demineralized water or if not possible just plain clean water. Then drain again and fill using a quality 50/50 premixed coolant. Make sure it’s replaced every 60.000 miles. If you have never replaced your coolant or use plain water as coolant, that is likely the source of the problem. Also, using old coolant or plain water will eventually block the radiator with rust and calcium deposits. A chemical flush will try to clean that up.
7. Step 6 requires you to flush the coolant system and then rinsing it with clean water. It is advisable to remove the thermostat in the process. Where the lower hose or hoses end and enter the engine, is where you will find the thermostat. You can easily undo the 2 or three bolts and remove the hose and remove the thermostat. Put the thermostat on a pan with hot boiling water and check if it opens. If not, replace it. Understand that the thermostat is a cheap part that is easily replaced. Instead of making a huge mess with coolant everywhere, why not replacing it anyway while you’re Flushing the system out with clean water?
If all these steps do not solve the issue, I fear that you might have a blown head gasket. Exhaust gasses are entering the coolant system and increasing the pressure, rendering it ineffective. I would advise you to do a CO2 test on the radiator then. You can find home kits for as little as 20 dollars online. Remove the radiator dap and place the tube on the radiator neck. Make sure it sits tight. Insert the blue fluid and let the engine run. If the fluid detects the presence of exhaust gasses in the coolant, it will turn green (small leak) or yellow (big leak). Please consult your local mechanic, he/she might already have a tester and could advise you on your options. Perhaps a new head gasket or just a sealer that might just do the trick? Head gasket replacements are quite expensive and a quality sealer might solve the from for less than a hundred bucks and keep the car running for a few more years. So no need to panic, you have options and ways to test what the problem is now.
Hope this helps, good luck!
Caution is advised, use water and heat resistant clothing and gloves. Also wear protective eyewear. Make sure you know how to open and close your radiator cap beforehand, coolant is highly toxic and can get dangerously hot. You don’t want to fiddle around with a cap and hot coolant in a hurry!
There is no way that you can check the faulty cylinder head gasket without striping
CO-test on radiator neck will detect the presence of CO gasses in the coolant while the car is running. And they can only get in the coolant by a blown head-gasket. Mayonaise-like or coffee with cream-like substance under your oil filler cap or on your oil-dipstick would likely be a leak of coolant in your oil. And white or black/blue smoke from the tailpipe would suggest either coolant or oil being burnt off in the cylinders. So yes, you can identify a blown head gasket without tearing the engine apart.
You may also want to perform a leak down test. This will tell you for sure if there is any air from the combustion chamber that is making its way into the cooling system. Black/blue smoke is a sign of oil burning, not coolant. Coolant smoke is white and sweet smelling.