How to Change Your Brake Pads (Step-by-Step)
Loosely interpreted, the 2nd Law of Thermodynamics tells us everything wears out, including brake pads. Though fine now, in weeks or months they’ll need replacing.
While you can simply go pay someone to change brake pads for you, with moderate DIY skills, you can do this job yourself. Here’s how to do just that on vehicles with a typical disc brake with floating brake calipers setup.
Related: Symptoms of Worn Brake Pads
Benefits of Changing Your Own Brake Pads
Now why do the job yourself? Primarily for this reason: You can save some money (especially if you already own a few tools), but not a whole lot. An average brake job (for either the front or rear brakes) will have a labor charge of about $150 to $300. That’s what you could save but you’ll still be paying for parts.
A second less tangible but important benefit will be the learning experience. That and a new understanding about how your brakes work. Knowing this could save you some repair dollars in the future by providing that awareness of what nearly worn out brakes look like.
How Difficult is it to Replace Brake Pads?
This is a moderately difficult job but most people can do it if they own a shop manual and follow the process below. If you’ve ever changed your own oil, you likely won’t have too much difficulty changing the brake pads on a vehicle equipped with disc (rotor) brakes (vs. drum brakes).
I can be a dirty job so the use of mechanic’s gloves is advised. In some cases, a dust-filtering face mask may be beneficial. Additionally you will need a shop manual, a reasonably good set of tools, and a number of expendables. See Tools Required and Materials Required sections below.
Some hand and arm strength will be required to loosen and tighten fasteners plus for removing and reinstalling the wheels.
How Long Does it Take to Change Brake Pads?
Unless you do this for a living, you will need about one Saturday morning (say, 2-3 hours) for replacing either the front or rear brake pads your first time. After you’ve done the procedure once, it should take you less time to replace them in the future.
See Also: How Long Do Brake Pads Last?
Do I Need to Change All Four Pads?
In the life of your car, the front pads will generally need replacing first. They do most of the work stopping the car and will wear out faster than the rears.
That being said, you should periodically check the pad thickness and and signs of uneven wear at all four wheel locations.
Note that pad replacement must be done in axle sets. This is why when you buy pads you will get either a front axle set, a rear axle set or both sets depending on your specific needs.
Where to Buy Brake Pads
You can pick up a set of brake pads at your local auto parts store or auto dealership or purchase them online. The benefit of purchasing locally is that you’ll get them quicker and the salesman will make sure you’ll get ones that fit. Purchase them online if you want a certain brand and the convenience of having them delivered to your door.
For more insight into the type of brake pad that would suit you best, a little study here will prove beneficial. While OEM (original equipment manufacturer) pads will work well for your car, they can be pricey. This article discusses five of the best brake pad manufacturers out there.
What About the Brake Rotors?
In some cases when replacing pads, the old brake rotors can be reused. But the truth is that most automobile repair shops will recommend either having the rotors resurfaced (aka: turned or re-machined) or replaced with new parts. Here’s why:
Like the pads, rotors will wear over time. They can be warped and have thickness variations that will impact braking performance. Resurfaced rotors will have trued-up (flat and parallel) surfaces that will give good brake performance and pad life. New discs will, of course, be new.
The one disadvantage with resurfaced rotors is that they will come off the brake lathe thinner than when new. Thinner rotors are neither as strong nor as resistant to heat as the new parts would be.
Keeping this in mind, here are your options:
- Purchase a new set of rotors. This is the safest bet for long pad life and best brake performance (see Note below). Or…
- Remove the rotors and have them resurfaced. Most auto parts store specialists can re-machine the rotors at a nominal fee. Ask them to confirm for you that sufficient material can be removed without going below the minimum thickness limit. It’ll take them about a day for this work. And this will provide you with the basic equivalent of new rotors at about one-fifth the cost.
- Ignore the rotors. This is typically not recommended but if you’re replacing pads simply due to wear and the rest of your braking system is functioning as it should and there’s no visible damage to the rotor (cracks, grooves, heat spots), you can probably get by without resurfacing the rotors (this time).
Purchase a set of OEM rotors if the store has them or rotors from one of the quality brands like Wagner, ACDelco, Brembo, Centric, EBC, Raybestos or Bosch.
Tools Required
- Shop Repair Manual (for your specific make and model of vehicle)
- The manual will provide specific directions for pad and rotor replacement. Also the essential bolt torques are provided with this resource.
- Haynes or Chilton manuals for most cars, SUVs and light trucks are available online or at your auto parts store. Instead of a hard copy manual, a CD-ROM manual may be available for your specific vehicle. Online manuals are also gaining popularity.
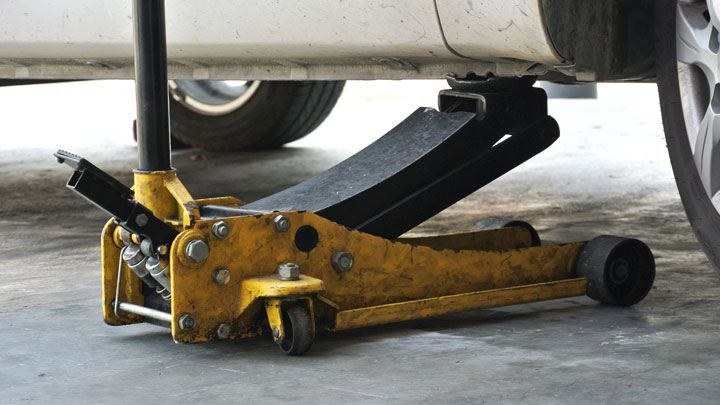
- Floor Jack such as:
- Arcan XL2T 2-Ton Floor Jack (for most vehicles)
- JEGS 3-Ton Floor Jack (for full-size pickup trucks and SUVs)
- (2) Jack Stands (3 ton capacity per pair)
- Big Red T43002A 3-Ton Jack Stands
- With jacks and jack stands, cheaper is not better. Look for quality in these devices. Your life may depend on it.
- Socket Set (3/8″ and 1/2″ drive) such as:
- Lug Wrench (or 1/2″ drive breaker bar) such as:
- 1/2” Drive Torque Wrench such as:
- 3/8” Drive Hex Bit Socket 2
- Lexivon Master Hex Bit Socket Set
- Check repair manual to see if SAE or Metric size fasteners used 1
- Hex bits are often called “Allen” wrenches but you won’t get enough leverage with a normal L-shaped Allen wrench.
- Flathead Screwdriver such as:
- C-clamp (able to open to at least 6”) such as:
- Wheel Chocks such as:
- Flat Piece of Wood (for caliper retraction; 5” long x 2” wide by 3/8 “ thick)
- 4” length of 2 x 4 wood (for rotor removal)
- Wire Brush such as:
- Work Light such as:
- Old Toothbrush or Paintbrush
- Q-Tips
- Shop Vacuum such as:
1 “Made in the USA” no longer means the fasteners on your car will be the US standard SAE sizes. Socket sets that include both SAE and Metric sizes are common and not overly expensive. Having such a set can come in handy well beyond just automotive repair work.
2 Many brake calipers will require the use of a hex bit to enable unfastening the piston assembly from the piston housing. Your shop manual may provide relevant information in this regard.
Materials Required
- High Quality DOT 3 or DOT 4 Brake Fluid
- Check your shop or owner’s manual to determine which type of fluid to use
- High Temperature Brake Lube such as:
- Anti-Seize Grease such as:
- Non-Chlorinated Brake Cleaner such as:
- Metal Coat Hanger
- 2-ft. of Small Diameter Hose or Tubing (or turkey baster)
- Shop Towels (or paper towels)
- Mechanic’s Gloves such as:
- Dust Mask
- Insulated Mug of Hot Coffee
Brake Pad Replacement (Step-by-Step)
Before we get into this, let me mention that your personal safety while working on your car or whatever else you might do in life is important. Taking unnecessary risks may pump up your adrenalin but especially does not belong in your garage while performing any car repairs.
For a comprehensive look at safe repair procedures, please review this article.
#1 – Before Starting
Get the needed parts. Yes, you might have to take the rotors back to the parts store for machining, but not if you are going you buy new ones. So get the parts and necessary materials required.
Above all else, update your shop with the essential tools listed above. My rule for tools is this: If some are good, more are better. Keep this concept in balance with marital harmony.
To protect your hands and/or keep them clean you may want to wear mechanic’s gloves. Prior to any process that raises dust into the air you should always don a protective dust mask.
Now let’s get to it…
#2 – Jack Up the Vehicle and Remove Wheels
Before jacking up your car, place wheel chocks behind the opposite axle’s tires. Think about which way the car would roll if you raised up either the front or rear end. This is especially important when working on the rear brakes since there is no parking brake on the front wheels.
Loosen the wheel lug nuts using a lug wrench or breaker bar (NOT a torque wrench). If you wait until the car is off the ground, the wheels will want to rotate when you try to loosen these nuts.
If you are replacing the front brake pads, firmly engage the car’s parking brake. Do not apply the parking brake when replacing rear pads; the engaged brake will prevent disassembly of the calipers.
While observing safe jacking practices, use your hydraulic floor jack to lift the front or rear of your car to a comfortable working height. Your shop manual will show you the optimum jack points for raising the car.
Now place two jack stands at right and left symmetrical locations and lower the floor jack slightly so most of the weight of the car is carried by the stands.
Suitable jack stand locations might be the horizontal frame rails or the frame structure that supports the front suspension lower control arms. Even though the car’s weight is on the jack stands, leave the floor jack in place holding some of the weight. This provides a backup load path should a jack stand fail.
Remove the wheels that are off the ground. You loosened the lugs before you jacked up the car so removal should be easy. Use a magnetic tray, coffee can, or other suitable container for the lug nuts and for all nuts, bolts and other hardware removed during this job.
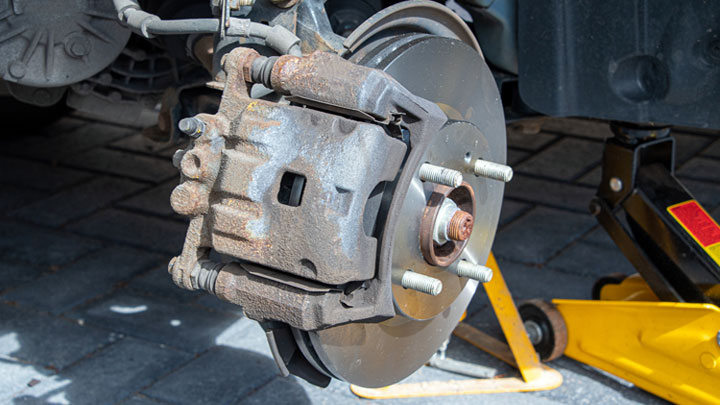
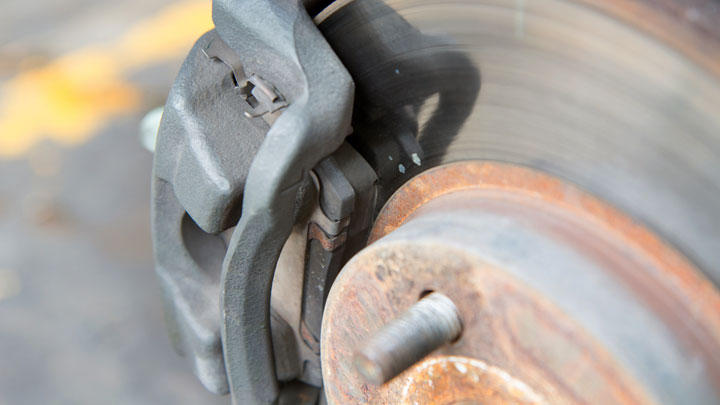
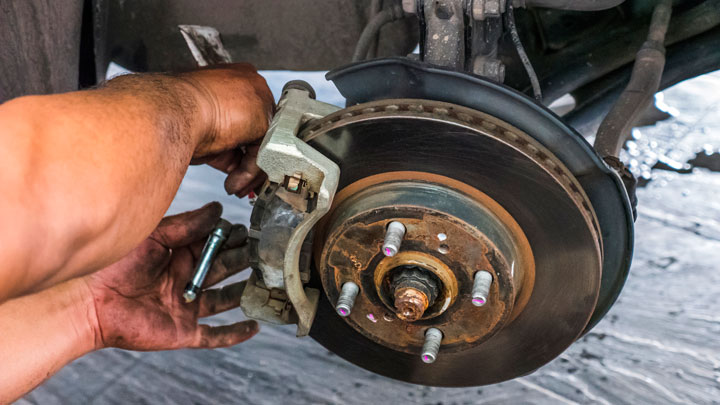
#3 – Remove Caliper Bolts and Caliper Assembly
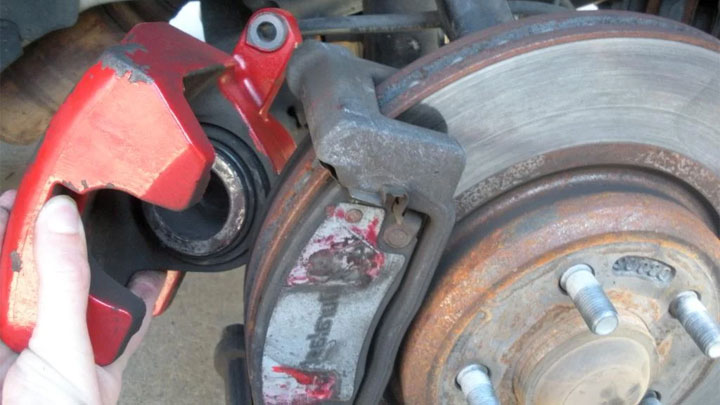
Begin on either side of the car. To improve access to fasteners, the front spindle and rotor assembly can be turned to the right or left by turning your steering wheel. If your car has a steering wheel lock, it will have to be released to enable this repositioning of the rotors.
Examine the brake caliper. Consider now how to gain access to the pads in order to remove them. You’ll note that the pads can only be removed in a direction toward the center of the rotor.
There will be one of two possible pad retention arrangements as follows:
Caliper Type 1: Pads Retained by the Piston Assembly
In this case the piston assembly will be seen to slide on two pins. To detach the piston assembly, remove each of the two sliding pins. A hex bit socket will be required. Pull the piston assembly and pads off the rotor.
Use a length of coat hanger wire to hang the piston assembly from some sturdy feature above such as a coil of the spring (if present). Do not allow the piston to hang by the hydraulic hose as this could damage the hose.
Caliper Type 1: Pads Retained By a Separate Bracket
The piston still slides on two pins but these pins need not be removed. The removable bracket can be dealt with in this fashion: Loosen the lower bracket bolt. Remove the upper bolt and pivot the bracket assembly and pads out away from the disc.
In both cases above, the pads will be lightly clamping the rotor and may not be free to slide off. In this situation, insert a screwdriver blade between the surface of either pad and the rotor. Now, pry the pad slightly away from the rotor. This will loosen both pads’ grip and they should be free to slide off the rotor.
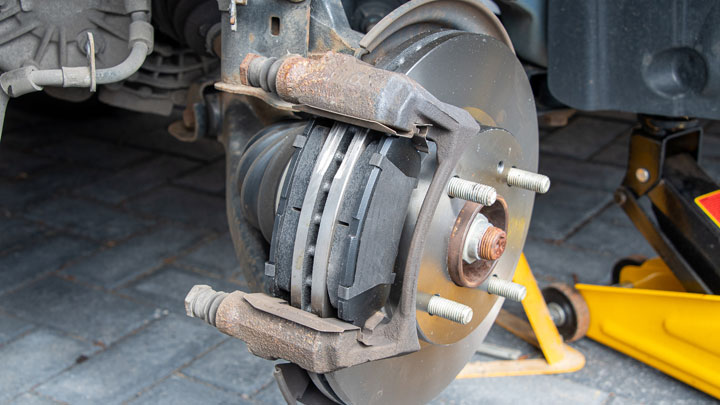
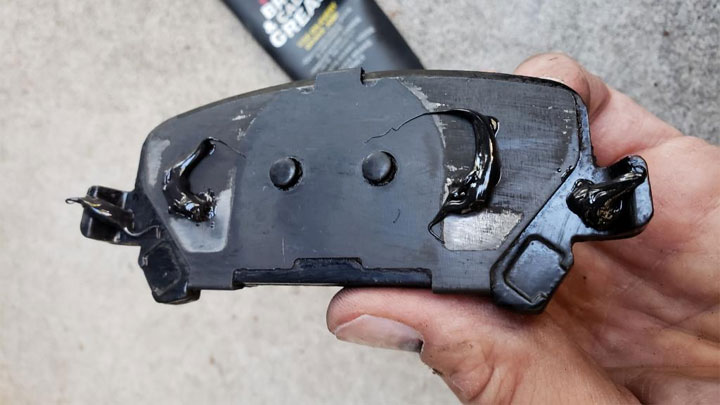
#4 – Remove Old Brake Pads
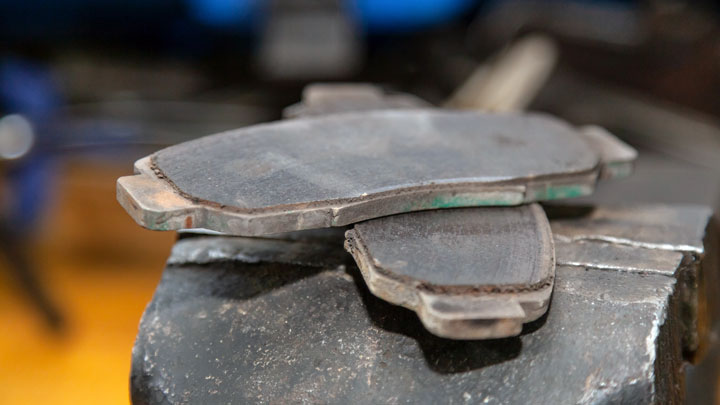
The pads sit in a groove in the surrounding assembly (either piston or bracket). They can now be removed by sliding them toward the open space vacated by the rotor.
There may be thin metal guide strips around the pad ends. Note how they are installed and remove them. If your new pads do not include these metal strips, you may have to reuse the old parts.
#5 – Examine Brake Rotor (Replace, Resurfacing, or Leave As-Is)
Examine the rotor and determine whether you will replace it, have it resurfaced, or simply leave for now. Review the What About the Brake Rotors? section above.
If you’re replacing or resurfacing your rotor, you will have to remove it. Here’s how:
- First, around the raised center section, look for a retaining screw through the rotor or a snap ring on one of the wheel studs. If present, either of these must be removed. Now, wiggling the rotor by hand, it should pull right off. But it may be stubborn. If so, steps 2 or 3 below may help.
- The rotor may have one or possibly two threaded holes opposite one another in the center section. If so, an appropriate size bolt can be screwed into one or both of these holes. Using a wrench, tighten the bolt(s). This force should be sufficient to loosen the rotor so you can pull it off.
- If there are no threaded holes, the rotor can be loosened using this technique: Place a short 2 x 4 block against one rotor edge and using a hammer, smack the block gently several times. This should loosen the rotor so that it will pull off.
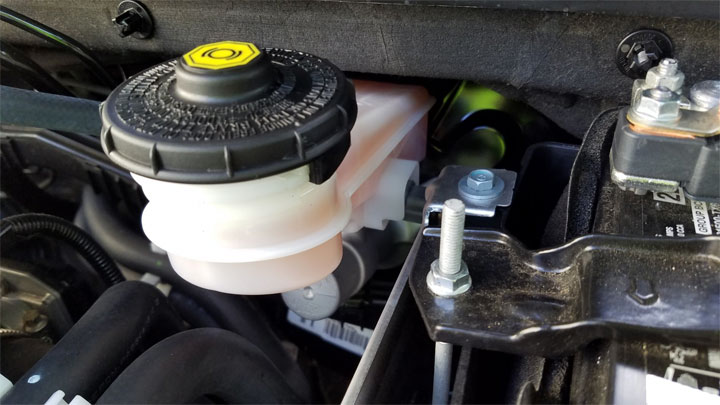
#6 – Retract (Push In) Pistons
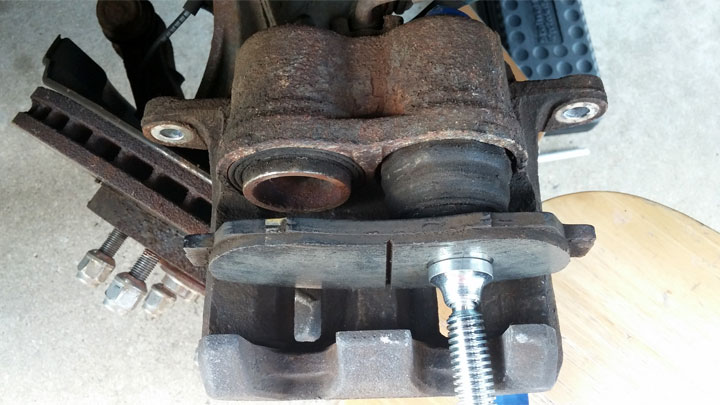
To prepare for the reassembly process, the caliper piston(s) must be pressed into the piston housing (piston push-back). When properly done, the piston’s exposed surface will be flush (or nearly flush) with the surrounding housing surface. This step will push fluid back into the brake master cylinder which is located in the engine bay.
First, find the brake master cylinder and carefully wipe away any dirt or grease around the cover. A toothbrush can be helpful for this task. Now remove the reservoir cover.
Siphon about 90% of the fluid from the reservoir into a suitable container using a section of tubing noted in the Materials list above or turkey baster. Replace the cover.
Note: Waste brake fluid must be disposed of properly. Your auto parts store or favorite repair shop may be able to dispose of it for you.
Now, use a flat piece of wood (5” long x 2” wide by 3/8 “ thick) or even the old brake pad and a C-clamp to press in the piston(s) in this fashion:
- Hold the wood against the piston(s).
- Place the C-clamp so that the screwed portion bears against the center of the wood, and the fixed portion bears against the back of the piston housing.
- Tighten the clamp applying moderate force until the piston(s) move completely into the piston housing.
Check the master cylinder. It should now be about one-half full.
#7 – Clean All Parts
Disassembly is complete for the first wheel. Now you should carefully clean all the reusable bolts and parts with the spray brake cleaner and as follows:
- If sliding pins holding the caliper have been removed, they should be wiped clean and rinsed with brake cleaner. The rubber boots on these pins should be intact. If they are not, a trip to the parts store will be required for replacements. Buy two sets because you may need a second set for the opposite side of the car.
- Using Q-Tips, clean the holes through which the sliding pins were installed. The pins themselves and the insides of the rubber boots should be lightly coated with high temperature brake lubricant prior to reassembly.
- Clean all the fasteners and metal shims/spacers that will be reused.
- Use a wire brush to clean the brake pad guiding surfaces in the piston assembly or pad mounting bracket. While brushing, use a shop vacuum to collect the airborne dust generated.
- Use a toothbrush or paintbrush for a final cleaning of these areas, Now wipe the brushed clean areas with a paper towel dampened with brake cleaner.
- Prior to reassembly, the brake pad guide slots in the piston assembly or mounting bracket should be given a very light coating of high temperature brake lube.
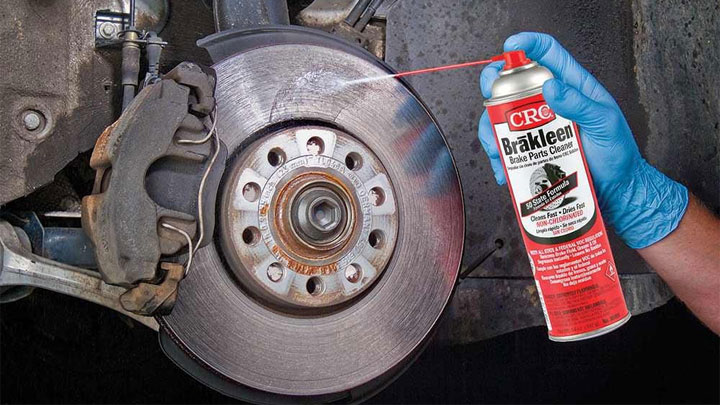
- Wipe clean the pushing face(s) of the caliper piston(s) using a paper towel dampened with brake cleaner.
- Wire brush the surface of the wheel hub where it contacts the brake rotor. Wipe away any loose residue with a paper towel dampened with brake cleaner.
- If you have purchased new rotors they will have a light oily rust proofing on them. Clean this off completely with brake solvent. Resurfaced rotors will similarly need to be wiped down with brake solvent.
- Using the anti-seize lubricant, brush on a thin coating in the area around the center hole in either the re-machined or new rotor where that hole goes against the center of the hub. This will help minimize local corrosion making any future rotor removal much easier.
Related: Brake Cleaner vs Carb Cleaner vs Throttle Body Cleaner
#8 – Install the Rotor (if Replaced or Resurfaced)
Install the rotor on the wheel hub. Reinstall the retention screw(s) or snap ring if either was originally provided to retain the rotor in place.
#9 – Install New Brake Pads
You are now ready to put in your new brake pads and reassemble this first brake caliper.
Unpackage the new brake pads. Sort out the various metal shims and spacers if provided. Select the inboard and outboard pads for the side of the car you are currently working on.
Pads may be marked with an arrow for direction of rotation or marked for location such as “RH – inside” and “RH – outside”. Observe any markings and install the pads as indicated.
The pads may not have any location or direction of rotation markings whatsoever. If this is the case, any pad will fit any location.
New pads will not require any special cleaning or degreasing. However, you will want to first apply a light coating of brake lube or grease to the backs of the pads where the piston makes contact.
Adding brake lube helps prevent that annoying squeaking or squealing noise when you press the brake pedal while driving. NEVER apply brake grease to the front of the pads where they contact the rotor.
Install the pads in the piston housing or mounting bracket. Install any of the provided metal shims and spacers. If none came with the brake pads, reinstall the ones removed earlier.
You should be able to see how things go together by the diagrams in your shop manual or by examining the yet to be disassembled brake on the opposite side of the car.
#10 – Re-Assemble Brake Caliper
Install the piston housing or mounting bracket to the spindle support using the original fasteners. Using the torque wrench, tighten the bolts to the specified torque value as shown in the shop manual.
Note: Proper bolt torqueing is critical. If these bolts were to come loose, braking performance at this wheel could be degraded thus hindering a safe stop.
Do not install the wheel yet. Leave that to the end of the job so you will have an assembled brake to observe as necessary when putting the opposite side together.
#11 – Repeat Pad Replacement for Other Side of Car
Repeat Steps #6 through #10 on the opposite side of the car.
#12 – Reinstall Wheels
Reinstall the wheels. Hand tighten the lug nuts as much as possible and then a bit more using the lug wrench with the car still on the jack stands
Using your floor jack, lift the car slightly so you’re able to remove both jack stands. Gently lower the car to the ground.
With the torque wrench, tighten the wheel lug nuts to the specified torque value in the shop manual or owner’s manual.
Note: Proper lug nut torqueing is critical. If these nuts were to come loose, severe damage to the studs and wheel will occur. In the worst case, a wheel could come off leading to a severe accident.
#13 – Add Brake Fluid
Prior to driving the car you must attend to some last steps with the master cylinder.
Since you’ve already siphoned most of the old brake fluid out in step #6, you’ll need to replace it. Open your container of new brake fluid and add brake fluid to the full mark. Install the cover.
#14 – Pump the Brakes
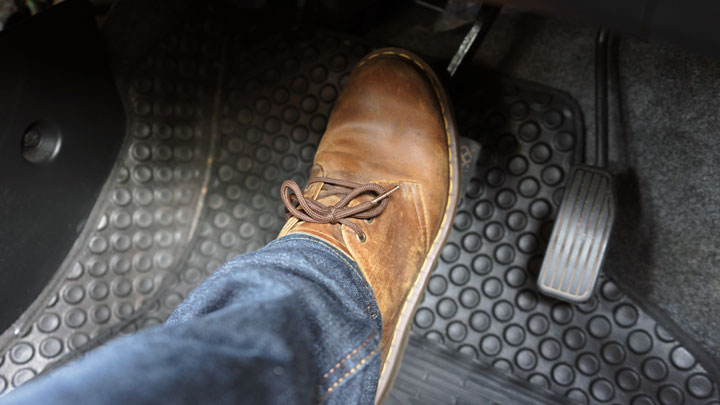
Start the engine and allow it to idle. From inside the car press the brake pedal firmly and release it fully. Repeat this eight times. The pedal initially will move close to the floor as the pistons extend and the pads fully squeeze the rotors.
The pedal will then firm up over the next several presses and will be completely firm at the fifth to eighth press. Shut off the engine.
See Also: 6 Causes of a Soft Brake Pedal
#15 – Top Off Brake Fluid
Remove the cover from the master cylinder and top it up with fresh fluid as pumping the brakes above pressurized the hydraulic brake lines with additional fluid. Install the cover.
#16 – Perform Brake Pad Bedding Procedure

The final step is to perform a proper bedding-in of the new brake pads. This ensures conformity of the pads to the rotors while transferring pad material to the rotor surfaces which helps stabilize braking action. This bedding procedure can significantly lengthen brake pad life.
Some brake pad manufacturers will provide bedding-in instructions in the packaging (or on the box) with their brake pads. If you have these instructions, follow them. If the new pads have no specific bedding-in instructions, follow this procedure:
- Drive to a straight and uncrowded road.
- Cruise at a steady 40 mph. Braking with moderate pedal pressure, bring the car to about 5 mph. Accelerate gently to 40 mph and drive at this speed for about one minute to cool the brakes.
- Repeat this process ten times. Following the tenth stop, accelerate to normal road speeds and drive for about five miles to completely cool the brakes.
- Over the next 400 to 500 miles try to avoid any panic stops which can overheat the brakes. Drive and brake normally. At the end of this process the brakes should be properly bedded in.
- Head back back home so you can put away your tools, clean up your work area, finish off that cold cup of coffee and pat yourself on the back for a job well done.
Pad Replacement on Rear Brakes
The discussion above focuses on changing pads in your car’s front brakes. Steps #1 through #16 will also apply to a pad change for your rear disc brakes. The only difference will be for brake calipers that include a means for the hand brake to apply the rear disc brakes for parking.
These calipers may require a different process to push back the piston. The piston push-back procedure in Step #6 above may not work for this type of caliper. Not all cars have this type of rear caliper. Your shop manual will give you insight into your specific rear caliper arrangement and how the rear piston for such a caliper must be pressed in.
This push-back process involves rotating the piston while pushing it back. A special tool can ease this method. It is the Lisle 28600 Disc Brake Piston Tool.
This tool on a short 3/8” drive extension will enable you to rotate the piston while pressing it back into the caliper. You will still have to follow the procedure in Step #6 above for draining fluid from the master cylinder reservoir.
- DIY Car Repair Tools – Floor Jack and Jack Stands - Dec 12, 2023
- DIY Car Repair Tools – Socket (Ratchet) Wrench - Nov 9, 2023
- DIY Car Repair Tools – Torque Wrench - Apr 20, 2023
This is probably the best written guide on changing your own brake pads that I’ve seen. You’ve obviously done this once or twice.
Changing brake pads is not so easy for me, But thanks for your inspiration.