How to Get Moisture Out of Headlights
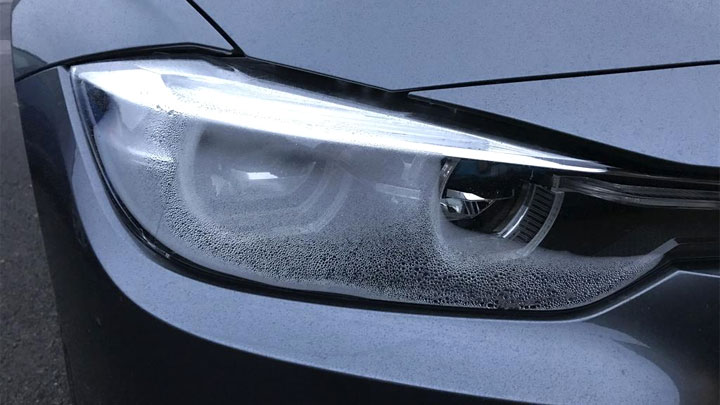
Foggy headlights dimming your view? Moisture trapped inside needs to be addressed before your next vehicle inspection or nighttime driving. But effective fixes depend on pinpointing exactly how moisture sneaked in.
Here, we’ll go over all the potential entry points so you can get your headlights dried out and your vehicle back on the road in no time.
See Also: 11 Types of Headlights
What Causes Moisture to Get in a Headlight?
There are three significant causes of moisture inside of your headlight. Any of these can also apply to other exterior lights such as fog lights, tail lights, and side markers.
See Also: 4 Symptoms of a Faulty Headlight Relay
#1 – Headlight Vent
The second potential cause is a blocked moisture vent. This is the best-case scenario because you won’t need to break the seal and repair the headlight if you do everything right.
A blocked moisture vent causes your headlight to fill with water because as the halogen bulb heats up and cools down, it creates condensation – and without anywhere for that condensation to go, you get moisture in the headlight.
#2 – Headlight Seal
The first is a faulty headlight seal. If this is the case, you’ll need to either repair the seal or replace the headlight.
#3 – Damage to Headlight
Finally, you could have a cracked or damaged headlight assembly. If this is the case, you’ll either need to get creative with repairs or, more likely, you’ll need to replace the headlight assembly.
Read Also: HID vs LED vs Laser Headlight Comparison
Is Condensation in the Headlight Assembly Bad?
It definitely can be. There are several reasons condensation in your headlight assembly is bad. For starters, it’s water around electrical components, which is always bad. You can short out the system, corrode wires, and create many problems that will require additional repairs.
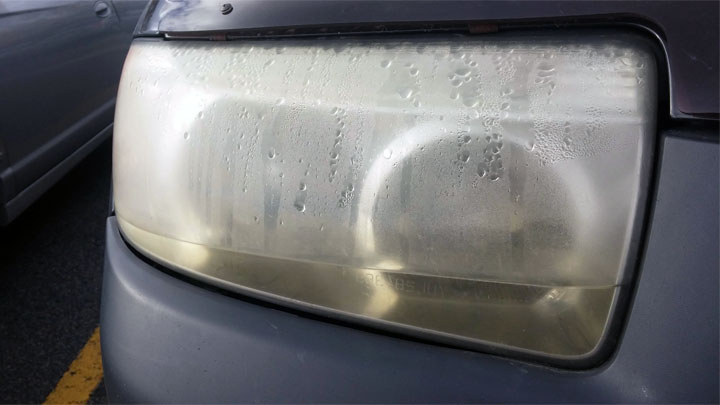
Not only that, but condensation in the headlight leads to foggy headlights. When you turn on the headlights, tons of light will get obstructed by the condensation, which means you won’t get as much visibility. It’s not hard to see why this is a big deal.
See Also: How to Remove Mold From Your Car Interior
In many cases, headlight condensation can go away on its own. Car manufacturers understand that some level of moisture is going to occur, so it should work itself out. In fact, automakers like Hyundai have released service bulletins instructing technicians not to interfere with normal headlight condensation.
Many times, the condensation will go away on its own when the weather warms up or when you start driving the car with the lights on. However, if the condensation does not go away on its own after a day or so, it’s time to locate and fix the actual cause of the problem.
How to Get Moisture Out of Headlights
Here are four methods of removing the current moisture and condensation in your headlight assemblies. Keep in mind that these are only temporary solutions until you find and fix the root cause of the problem which we’ll discuss in the next section.
#1 – Compressed Air
You can use a can of compressed air or an air compressor with a blow gun attachment. Make sure to hold the can or blow gun at least 6 inches away from the headlight assembly to avoid damaging it and direct the stream of pressurized air inside the headlight, focusing on areas with excess moisture.
Remember, you should only use this method if there is moderate moisture, as too much pressure can damage the seals of your car headlight.
#2 – Hair Dryer or Heat Gun
Both a heat gun (faster) and hair dryer (safer) are good ways of getting rid of condensation. Simply turn on your chosen device and aim it at the affected headlight a few inches away for a couple minutes or until the moisture is gone.
The heat will help evaporate the excess moisture inside your headlight assembly. It’s important to keep the heat source at a safe distance and not to overheat the headlight, as this could potentially damage the plastic and seals.
#3 – Silica Gel Packets
Not exactly the best method but it works. Take 1 to 2 silica gel packets (it’s a good idea to save these from products you purchase) and place them inside your car headlight assembly. Simply leave them in there overnight or for a full day (don’t drive the car). They will absorb the excess moisture, leaving your car headlights dry.
#4 – Dehumidifier and Ventilation
For severe cases of moisture in the headlights, you might want to try the dehumidifier and ventilation strategy. Start by parking your car in your garage. Place a portable dehumidifier near the vehicle, preferably close to the affected headlights.
Then simply leave the dehumidifier running for several hours or overnight to help remove the excess moisture from the car headlights.
How to Fix Condensation In Headlights
If you have condensation in your headlight assembly, you need to fix the root cause. There are a few different ways to do this, and it all depends on how the condensation is getting in and how much condensation is there.
Cracked Headlight Assembly
Let’s start with the worst-case scenario – a cracked headlight assembly. We’re not talking about a faulty seal or blocked vent here, but a full crack. In this case, you’ll need to replace the entire headlight assembly to prevent future water from getting in.
For short-term fixes, you can try using a hairdryer to dry everything out, but it’s going to be hit or miss if this works well enough. But even if it does, the next time there’s morning dew, rain, or any other condensation, you’ll end up right back where you started.
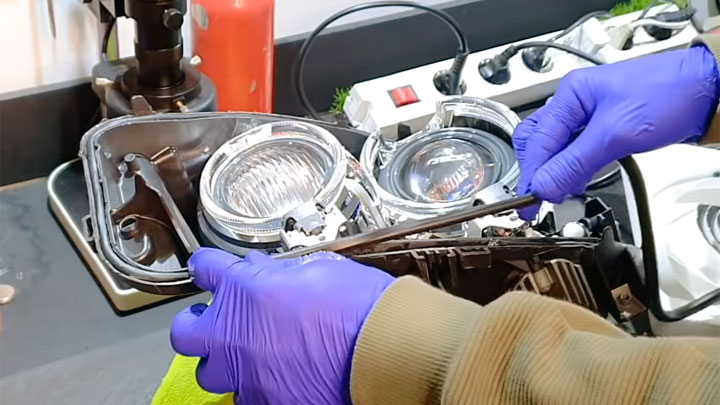
Bad Seal
The next problem is a faulty seal. This is a pretty big deal since the seal isn’t a super easy fix most of the time. You need to start by removing the headlight assembly and gently prying the assembly apart at the seal.
Start by drying everything off inside. After that, you’ll need to either get a hot glue gun and run a new bead around the entire assembly, or if you’re lucky, use a seal for the headlight from an auto parts store.
But most headlights don’t have seals like this, so you’ll likely need to do it yourself. You need to get an airtight seal, so take your time and do it right the first time.
Read Also: How to Dry Out a Car Interior After a Water Leak
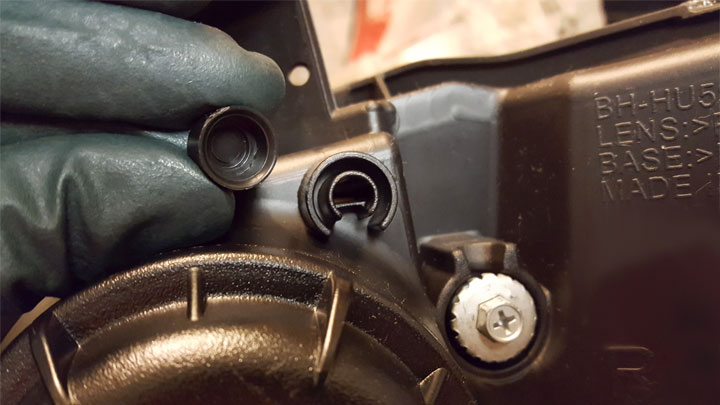
Blocked Moisture Vent
The final potential problem is a blocked vent. This allows the condensation that builds up from the changing temperature caused by the bulb to escape. All kinds of debris can block this vent, so check that it’s clear before removing any seals.
If it is, do your best to get the debris out of the headlight instead of pushing it in. If it does get stuck inside the headlight assembly, you’re right back to needing to break the seal to clean everything out.
See Also: Tail Lights Don’t Work But Brake Lights Do
What If Water Continues to Get in the Headlight?
If water continues to get into your headlight after your repair, chances are you still have a faulty seal or a blocked vent. You can either reattempt repairs or replace the headlight assembly.
While replacing a headlight assembly isn’t always cheap, it’s a better outcome than shorting out the system and starting a fire or losing visibility at night and getting into an accident.
Whatever you do, don’t accept moisture in the headlight assembly. It’s only a matter of time until the minor inconvenience turns into a big problem.

- P0521 Code (Symptoms, Causes, How to Fix) - Mar 22, 2024
- How to PROPERLY Clean 5 Types of Steering Wheel Materials - Feb 19, 2024
- What Should You Do If Your Check Engine Light Comes On? - Nov 6, 2023
I drilled two holes in the top of the light assembly and it worked no more moisture!