P0154 Code (Symptoms, Causes, and How to Fix)
Onboard computers rely on oxygen sensor input to tune the air/fuel ratio. When sensors fail, check engine lights illuminate with codes like P0154 which indicates a loss of signal, robbing the PCM of data vital for performance and economy.
Learn the common causes of a P0154 code, it’s severity, and the repair steps needed to fix the issue and erase the warning light.
Related: Bank 1 vs Bank 2 Sensors (What’s the Difference?)
What Does Code P0154 Mean?
Today’s vehicles rely upon a series of oxygen sensors to detail the oxygen density of an engine’s spent combustion gasses, thereby providing feedback relating to overall combustion efficiency. Sensors of this type are located both in front of, and directly behind the catalyst for each respective cylinder bank, in a bid to gauge catalyst efficiency as well.
Each oxygen sensor operates off of the relationship between a specified reference voltage, and the feedback relayed back to the engine’s ECM/PCM. This feedback is varied based upon the density of oxygen as it pertains to the exhaust gasses that are being sampled. The internal resistance of the sensor in question fluctuates to account for these variances.
In the case of DTC P0154, a vehicle’s ECM/PCM has determined that no active feedback is being relayed by the unit’s bank 2, position 1 oxygen sensor.
This, in turn, leaves the engine’s control module without valuable feedback required to determine the correct air/fuel ratio for the conditions at hand. As a result, an active DTC is logged, and a vehicle’s check engine light is illuminated.
Related: P0140, P0141, P0151, P0153, P0155, P0157, P0158, P0160, P0161
Symptoms of Code P0154
Diagnostic trouble code P0154 is often accompanied by a number of secondary symptoms, some of which tend to be more severe in nature than others. Learning to identify these symptoms can be of immense value when hoping to quickly rectify the issue at hand.
The following are several of the most common symptoms associated with diagnostic trouble code P0154.
- Illuminated check engine light
- Intermittent stalling
- Erratic Idle
- Misfire at higher RPM
- Strong fuel smell from exhaust
- Reduced fuel economy
Causes of Code P0154
Diagnostic trouble code P0154 can be caused by numerous underlying issues, some of which tend to be more perplexing than others. Understanding the potential causes behind such a condition often prove invaluable when attempting to make short work out of the diagnostic process.
The following are a number of the most common causes of diagnostic trouble code P0154.
- Compromised oxygen sensor (bank 2, position 1 location)
- Damaged exhaust
- Marginalized 02 sensor connector
- Circuit malfunction/wiring damage
Is Code P0154 Serious?

Diagnostic fault code P0154 is generally thought to be rather serious in nature, due primarily to the fact that it has the potential to leave you stranded with little to no recourse in certain situations.
This is not only an extreme inconvenience, but also a safety hazard of sorts as well, due to the unpredictability of such circumstances.
In any event, it’s always advisable to diagnose and repair the root cause of a vehicle’s P0154 fault code at the first available opportunity. Doing so minimizes the risk of finding yourself stranded along the roadside, or faced with the prospect of making already difficult matters worse.
If you do not feel comfortable tackling such repairs yourself, consult a trusted service center as soon as possible.
How to Fix Code P0154
The following are a series of steps that can be followed to assist in locating and repairing the root cause of your vehicle’s active p0154 diagnostic fault code. As always, be sure to consult factory-specific service literature for your particular make/model of vehicle before proceeding with any such repairs.
#1 – Check For Additional DTCs
Before beginning the diagnostic process, be sure to check for the presence of additional diagnostic trouble codes. If any such codes are found, each should be thoroughly diagnosed prior to proceeding.
#2 – Perform Visual Inspection
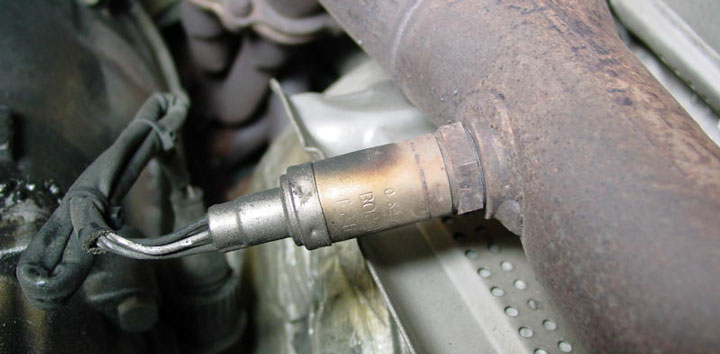
Begin by carefully inspecting your vehicle’s bank 2, position 1 oxygen sensor. Check for signs of obvious external damage, as well as any fraying or breakage of sensor-specific wiring.
If any sensor-related damage is noted, replacement will be required. Likewise, any wiring damage that has been uncovered should be repaired before proceeding.
#3 – Check Sensor Resistance
With the use of a quality multimeter, carefully check to verify the internal resistance across the affected oxygen sensor. This resistance should be compared to that specified by your vehicle’s manufacturer.
Any out of specification readings will ultimately necessitate sensor replacement.
#4 – Verify All Sensor Inputs
Currently, most oxygen sensors are designed to be of a four-wire configuration. These wires should include a reference (+) feed, a circuit ground feed, a heater (+) feed, and a heater negative feed.
With the use of a quality multimeter, check to ensure that each of these inputs are present. If all inputs are present, yet no sensor activity has been detected, replacement will likely be necessitated.
#5 – Source Inputs
If the affected oxygen sensor lacks one or more inputs, it will be necessary to pinpoint the loss of the offending feed, by referencing the opposing end of the circuit.
If these inputs are present at the ECM/PCM, yet not at the affected O2 sensor, an open within the circuit itself is to blame. On the other hand, a lack of input directed from the ECM/PCM would point heavily toward a controller failure.

- P0480 Code (Symptoms, Causes, and How to Fix) - Apr 19, 2024
- Car Temperature Gauge Stopped Working? (Here’s Why) - Apr 15, 2024
- Ignition Coil vs Coil Pack (What’s the Difference?) - Apr 8, 2024